The PLS-FX300HU high-uniformity integrated xenon lamp light source provides stable, high-uniformity square light spots, meeting the precise development needs of photocatalysis and photoelectrocatalysis research. It is a high-performance product with superior energy, spectral characteristics, and irradiance stability.
The PLS-FX300HU high-uniformity integrated xenon lamp light source has significantly improved energy uniformity, making it suitable for experiments that demand high uniformity, such as photoelectrochemical studies, quantum efficiency measurements, and Faraday efficiency measurements.
The PLS-FX300HU high-uniformity integrated xenon lamp light source features a built-in aperture with six different settings corresponding to different aperture sizes. You can adjust the light output by changing the aperture size. Additionally, the built-in aperture can be finely adjusted in conjunction with current regulation to achieve precise control of light power.
I. Inspection and Hardware Connection of the PLS-FX300HU High-Uniformity Integrated Xenon Lamp Light Source
1. Upon receiving the PLS-FX300HU high-uniformity integrated xenon lamp light source, inspect the external packaging for any extensive damage. If damage is found, refuse to accept the delivery and request the courier company to handle it properly. Also, contact Perfectlight Technology's after-sales support.
2. According to the product's packing list, remove the lightbox and accessories, and confirm their integrity. Please note that the optical fiber and the fixed adjustment rod's lower foam layer contain a fixed base and must be removed.
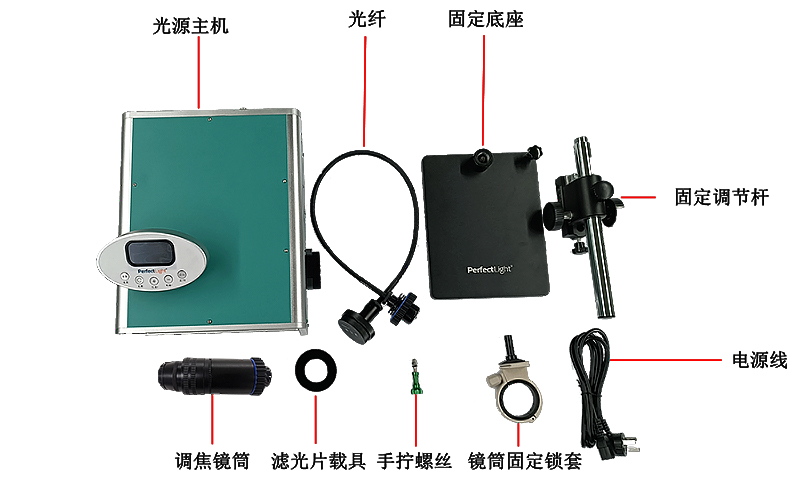
Figure 1. Physical Accessories of the PLS-FX300HU High-Uniformity Integrated Xenon Lamp Light Source
3. Place the PLS-FX300HU high-uniformity integrated xenon lamp light source's light source main unit on a stable, clean, and dry tabletop. Ensure that the power switch is in the OFF position and insert the power cord into the AC 220V interface on the rear panel.
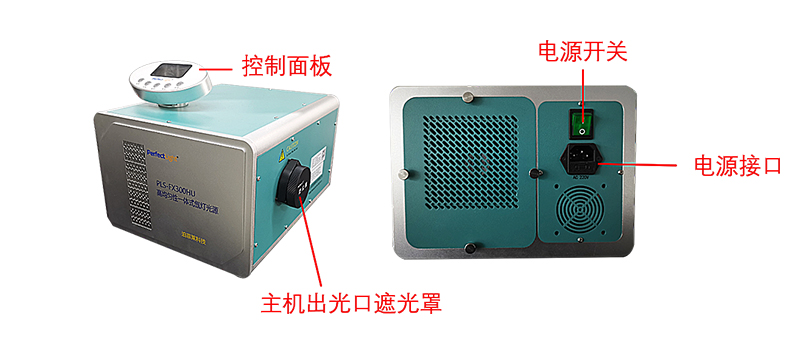
Figure 2. Front and Rear Panels of the PLS-FX300HU High-Uniformity Integrated Xenon Lamp Light Source Main Unit
4. Remove the light source main unit's light output cover and the dust cover from the focusing lens barrel's light entrance. Align the gap with the metal card pin and lock the focusing lens barrel by rotating it clockwise, completing the initial installation.
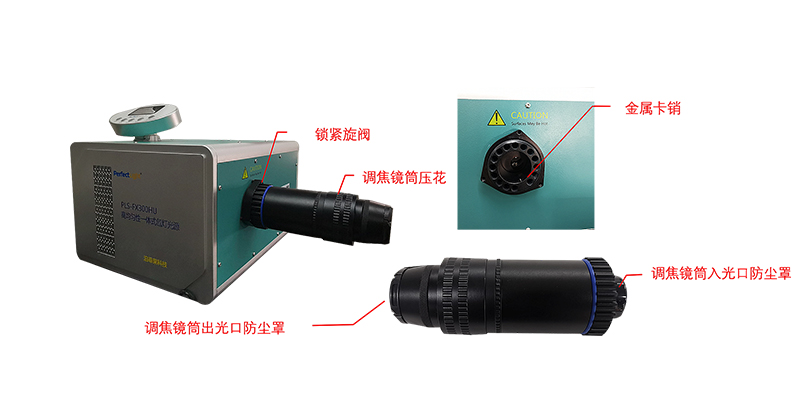
Figure 3. Schematic Diagram of the Installation Position of the Focusing Lens Barrel of the PLS-FX300HU High-Uniformity Integrated Xenon Lamp Light Source
II. How to Use the PLS-FX300HU High-Uniformity Integrated Xenon Lamp Light Source
1. Remove the light output cover from the PLS-FX300HU high-uniformity integrated xenon lamp light source's focusing lens barrel. Press the power switch, and the power indicator will light up.
2. Setting the Timer: After turning on the power, the main screen is displayed. Press the "Set" button to enter the timer setting interface.
2.1 Use the "Aperture" button to adjust the time position. The number before the colon represents the hour, and the number after the colon represents the minute.
2.2 Use the "Current+" and "Current-" buttons to adjust the numerical value. After setting the time value, press the "Set" button to return to the main startup interface.
2.3 Once the timer is set, press the "Start" button to activate the xenon lamp light source. The main unit will perform a self-test, and the built-in aperture will automatically calibrate. The screen will display the light feedback value as 0 or a small value due to external light influence, but the accurate light feedback value will be displayed a few minutes after startup.
3. Setting the Timer: While the PLS-FX300HU high-uniformity integrated xenon lamp light source is operational, press the "Set" button to enter the timer setting interface. After the set timer duration elapses, the xenon lamp light source will automatically turn off. The program will save the currently set timer duration. When you turn on the xenon lamp light source again or use it for the next time, it will automatically use the previously set timer duration, with a maximum setting of 99:59.
If you don't need to use the timer shutdown function of the PLS-FX300HU high-uniformity integrated xenon lamp light source, simply set the timer duration to 00:00 in the timer setting interface.

Figure 4. PLS-FX300HU High-Uniformity Integrated Xenon Lamp Light Source Main Interface and Timer Setting Interface
4. Focusing
Rotate the textured part of the focusing lens barrel to adjust the focal length. The focusing lens barrel can extend forwards and backwards within a range of 1-5 cm according to the required working distance in the experimental setup. Adjust the light spot size to form a visible and uniform square light spot.
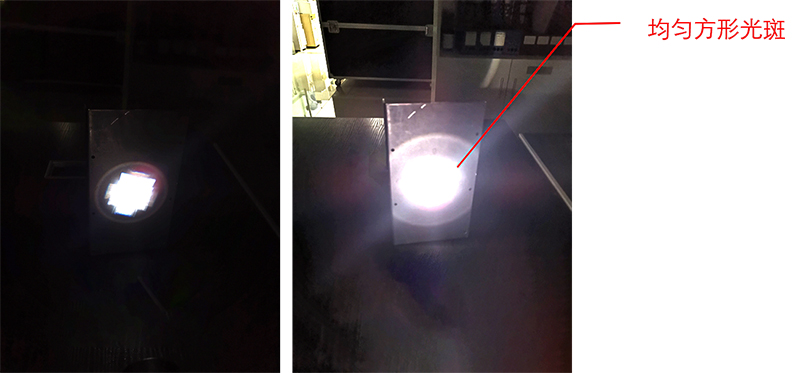
Figure 5. Comparison of Light Spots Before and After Focusing on the PLS-FX300HU High-Uniformity Integrated Xenon Lamp Light Source
5. Adjusting Light Power
The PLS-FX300HU High-Uniformity Integrated Xenon Lamp Light Source has two methods for adjusting light power: aperture adjustment and current adjustment.
Aperture adjustment is for coarse adjustment, while current adjustment is for fine-tuning. When using, adjust the aperture first, and then adjust the current.
5.1 Aperture Adjustment
The PLS-FX300HU High-Uniformity Integrated Xenon Lamp Light Source has six built-in apertures of different sizes. You can adjust the light output by pressing the "Aperture" button, and the display will show the corresponding aperture number.
Aperture position 1 represents the smallest aperture, resulting in the weakest light output, while aperture position 6 represents the largest aperture, resulting in the strongest light output.
5.2 Current Adjustment
You can adjust the current using the "Current+" and "Current-" buttons on the control panel. The optimal working current for the PLS-FX300HU High-Uniformity Integrated Xenon Lamp Light Source is within 15±1 A. If the light power is insufficient for your experiment, you can increase the current to increase the light power. The current can be set between 12 and 21 A. However, using a current of 18 A or higher for a xenon lamp light source with less than 100 hours of use may accelerate the aging of the lamp bulb and reduce its lifespan.
6. Installing Filters
Just like other series of xenon lamp light sources, the PLS-FX300HU High-Uniformity Integrated Xenon Lamp Light Source can be used with filters. First, screw the filter holder on the inner side of the focusing lens barrel's light exit. Then, open the outer side of the filter holder, place the filter inside the filter holder, and screw it shut to complete the installation.
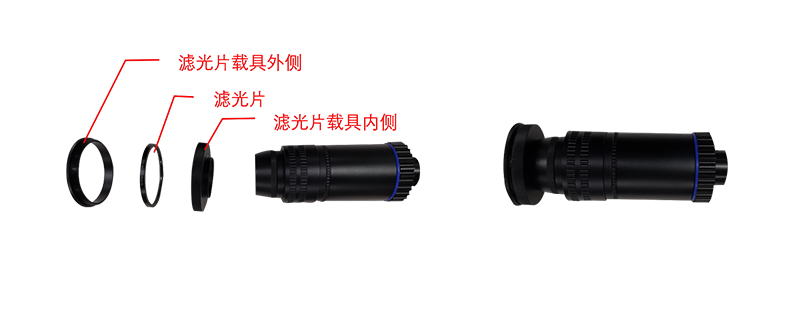
Figure 6. Installation of Filters on the PLS-FX300HU High-Uniformity Integrated Xenon Lamp Light Source
7. Connecting Optical Fibers
If the focusing lens barrel cannot directly meet the angle requirements for light irradiation in your experiment, you can change the light path direction and distance by adding optical fibers to the PLS-FX300HU High-Uniformity Integrated Xenon Lamp Light Source.
① Remove the focusing lens barrel from the xenon lamp light source main unit and connect the focusing lens barrel's light entrance to the optical fiber's light exit.
② Connect the optical fiber's light entrance to the xenon lamp light source main unit's light exit, ensuring that you tighten the locking valve firmly.
③ Use the barrel fixed locking sleeve to secure the focusing lens barrel to the fixed base. You can adjust the height and light path direction of the xenon lamp light source's light exit according to the experimental scene's requirements.
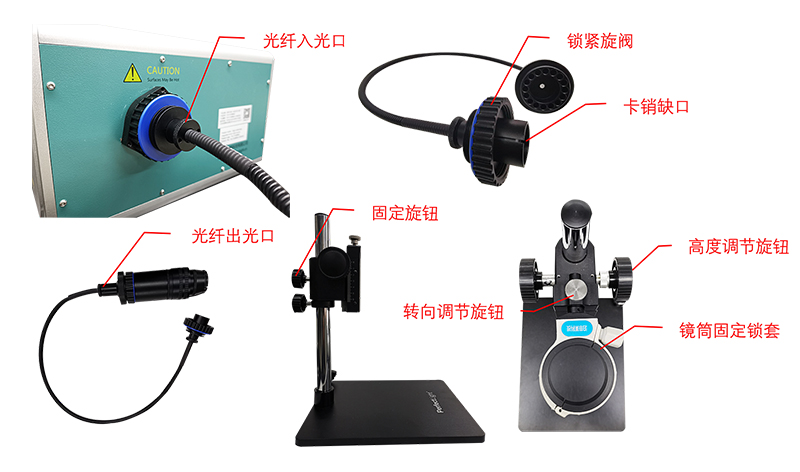
Figure 7. Installation of Optical Fibers on the PLS-FX300HU High-Uniformity Integrated Xenon Lamp Light Source
8. Turning Off
After finishing the experiment, press the "Start/Stop" button to turn off the xenon lamp light source. The PLS-FX300HU High-Uniformity Integrated Xenon Lamp Light Source has a fan delay function, which means that even after the xenon lamp light source is turned off, the lamp bulb's cooling fan will continue to run. When the countdown on the screen reaches 0, the cooling fan will automatically turn off, and you can then switch off the power.