Xenon lamp sources play a crucial role in simulating sunlight and are indispensable equipment in photochemical experiments, as shown in Figure 1.
The xenon lamp bulb is the core component and consumable of the xenon lamp source. Mastering the correct and safe bulb replacement operation is essential for photocatalysis experiments.
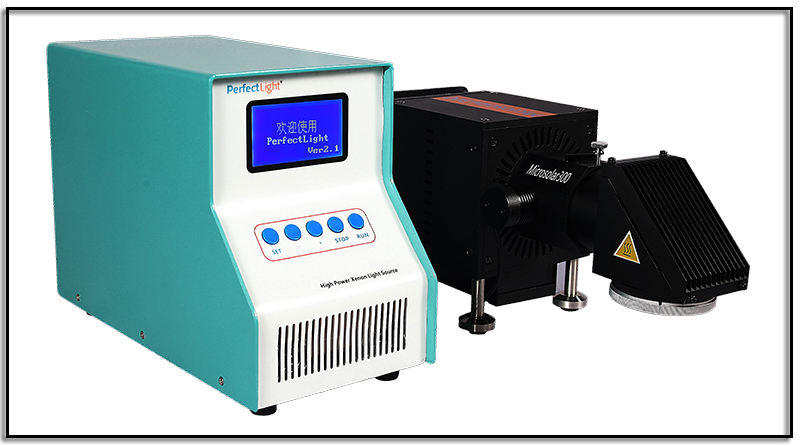
Figure 1 Microsolar 300 Xenon Lamp Source Overview
I. When is it necessary to replace the xenon lamp bulb during the use of the xenon lamp source?
As the duration of use of the xenon lamp source increases, abnormal phenomena such as overvoltage faults or flickering may occur. When the Microsolar 300 xenon lamp source exhibits the above phenomena, it indicates that the effective service life of the xenon lamp bulb in the xenon lamp source has reached its limit. To ensure smooth experiments, it is necessary to replace the bulb as soon as possible.
1. Overvoltage Fault Phenomenon
When the xenon lamp source is triggered, if the LED display on the light source power supply box shows "overvoltage fault," you need to click the "SET" button on the xenon lamp source power supply box twice in succession to enter the xenon lamp source usage timer interface. Check the usage time of the xenon lamp bulb. If the usage timer for the xenon lamp bulb shows 700 hours, you need to replace the xenon lamp source bulb as soon as possible, as shown in Figure 2.
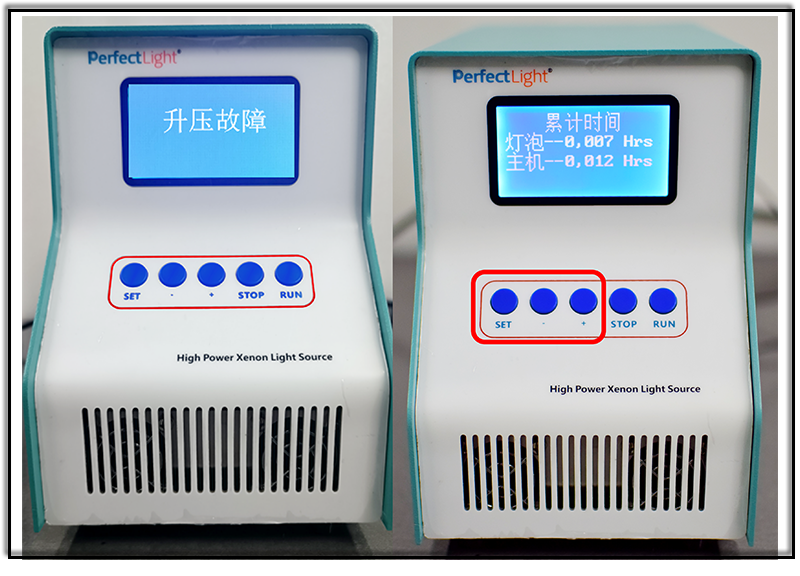
Figure 2. Xenon Lamp Power Supply Box 'Overvoltage Fault' and Bulb Timer Interface
2. Flickering Phenomenon
When the xenon lamp source is triggered, the light source flickers briefly and then goes out rapidly, as shown in Figure 3.
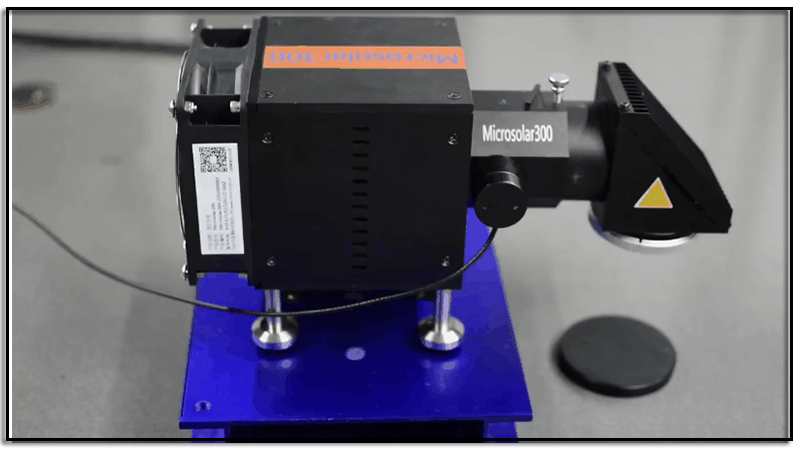
Figure 3. Xenon Lamp Source Flickering Phenomenon
II. Procedure for Replacing Xenon Lamp Bulb in Xenon Lamp Source
1. Prepare the tools needed to replace the xenon lamp bulb: a Phillips screwdriver, a 3mm hex wrench, and a new bulb containing thermal grease, as shown in Figure 4.
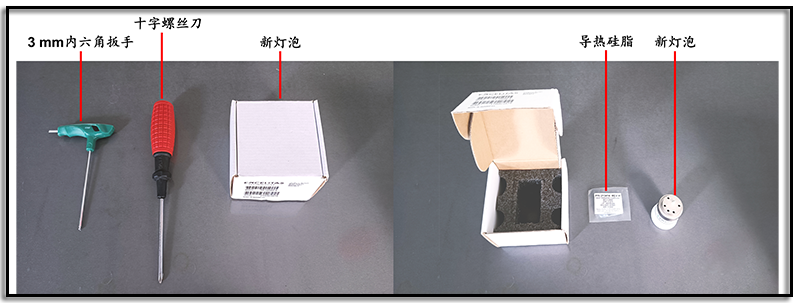
Figure 4. Preparation of Tools
2. Unplug the power cord of the Microsolar 300 xenon lamp source, remove the connection plug and light feedback signal plug on the xenon lamp source lamp box, remove the light source turning head, and make sure the power supply box and lamp box are in a cooling state, as shown in Figure 5.
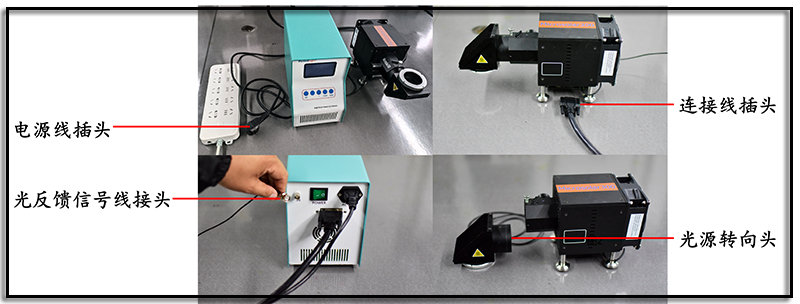
Figure 5. Procedure for Removing Xenon Lamp Bulb
3. One by one, remove the fixed screws of the top cover and front panel of the xenon lamp source lamp box, separating the top cover and front panel from the lamp box, as shown in Figure 6.
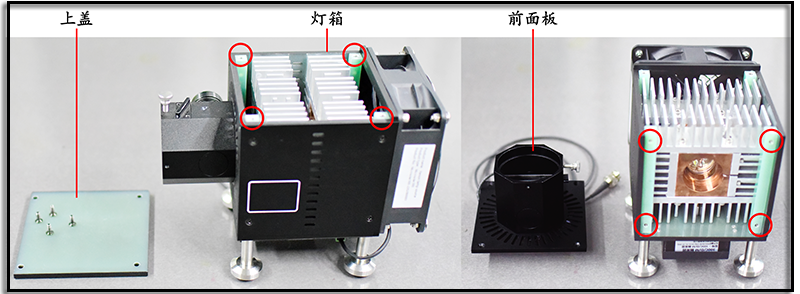
Figure 6. Diagram Showing Disassembly of Xenon Lamp Source Lamp Box
4. Loosen the fixed screws of the side panel of the xenon lamp source lamp box. There is no need to remove the fixed screws of the side panel of the xenon lamp source lamp box; just loosen them enough to allow the internal lamp body assembly of the xenon lamp source lamp box to be loosened and removed, as shown in Figure 7.
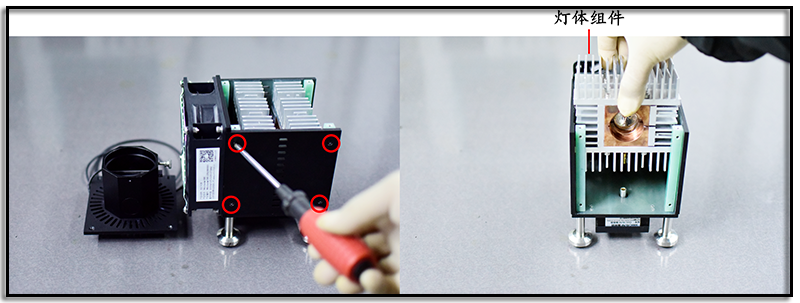
Figure 7. Diagram Showing Removal of Lamp Body Assembly from Xenon Lamp Source Lamp Box
5. Loosen the fixed screws of the cathode heat sink, remove the fixed screws of the anode heat sink, and remove the cathode heat sink and anode heat sink, as shown in Figure 8. Dispose of the old bulb along with other discarded instruments, and report it for disposal by your institution.

Figure 8. Diagram Showing Removal of Bulb
6. Wear laboratory-specific gloves, take the bulb and thermal grease from the new bulb packaging, and evenly apply thermal grease to the three surfaces shown in Figure 9.
Note: Apply thermal grease to all exposed metal parts of the new xenon bulb and do not apply thermal grease to the ceramic surface.
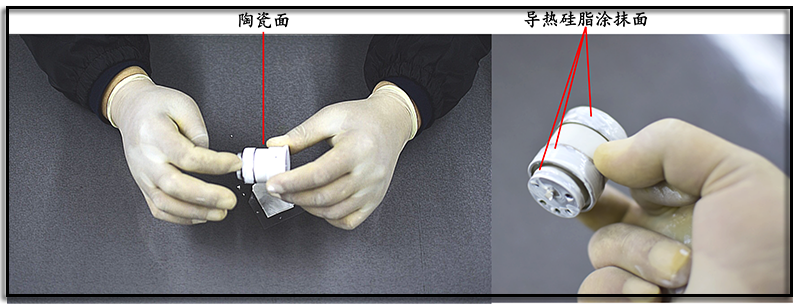
Figure 9. Diagram Showing Application of Thermal Grease
7. First, place the new bulb with applied thermal grease into the hole of the anode heat sink, tighten the fixed screw of the anode heat sink, as shown in Figure 10. Then, slowly push the cathode heat sink into the other end of the xenon lamp bulb. When the cathode heat sink completely wraps around the other end of the xenon lamp bulb, tighten the fixed screw of the cathode heat sink to complete the assembly of the lamp body.
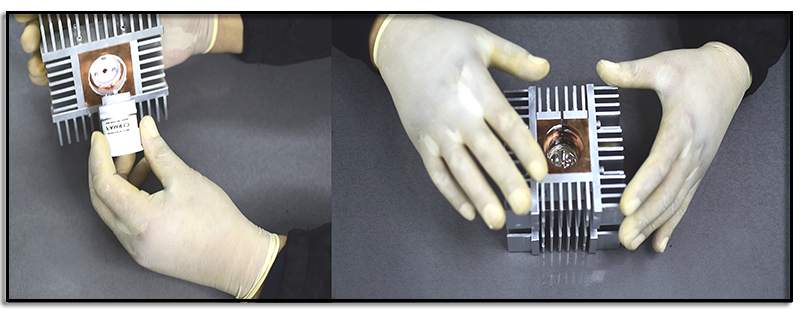
Figure 10. Diagram Showing Assembly of Bulb and Heat Sinks
8. Follow the disassembly sequence from steps 1 to 4 to complete the remaining assembly steps. Insert the assembled lamp body into the lamp box of the xenon lamp source, tighten the fixed screws of the side panel of the xenon lamp source lamp box, sequentially install the front panel and top cover of the xenon lamp source lamp box and tighten the fixed screws, install the turning head, and connect the lamp box to the power supply box connection cable and light feedback signal cable.
III. Running Test
After replacing the xenon lamp bulb in the xenon lamp source, it is necessary to perform a test to verify that the assembly of the new bulb is correct.
1. Resetting the Xenon Lamp Bulb Usage Timer
After replacing the bulb in the Microsolar 300 xenon lamp source, the bulb timer must be reset; otherwise, the usage time in the xenon lamp source program will not change, and the power supply box screen may display an "overvoltage fault" error. The reset procedure is as follows:
After the xenon lamp source is powered on, press the "SET" button on the power supply box twice to enter the bulb timer interface. Simultaneously, press the "+ and "-" buttons on the power supply box to reset the bulb timer.
2. Xenon Lamp Source Trigger Test
Connect the power cable, connection cable, and light feedback signal cable of the xenon lamp source, turn on the power supply box switch, wait for the light source to preheat for 30 seconds, then press the "RUN" button to light up the xenon lamp source. After the xenon lamp source has been lit for 1 minute, press the "STOP" button to turn off the xenon lamp source. After 1 minute of cooling, trigger the light source again.
Repeat the triggering of the xenon lamp source 5 times, and if none of the following phenomena occur, the bulb replacement is successful:
① The xenon lamp source does not light up normally;
② Unusual noises when the xenon lamp source is lit.
If any of the above phenomena occur after replacing the xenon lamp bulb, check whether all the connections of the xenon lamp source are good or, with the power off, disassemble the xenon lamp source lamp box again to confirm that the new xenon lamp bulb is securely assembled. If there are no issues, but the xenon lamp source still does not work correctly, please contact Perfectlight Technology's after-sales customer service promptly.
